ranglani.manish90@gmail.com

GitHub Agentic Workflows – Working Implementation Part1

As part of my ongoing exploration of modern DevOps and AI‑assisted engineering practices, I recently built a Proof of Concept (POC) using the newly launched GitHub Agentic Workflows. The goal was simple but impactful: automate the generation of a daily status report by letting agents reason over repository activity and produce a meaningful summary.
 
In this blog, I’ll walk through why I chose this use case, how the agentic workflow is designed, and what I learned from the POC.

Why Daily Status Reports?

Daily status reporting is one of those activities that is essential but often repetitive:

  • Engineers manually summarize commits, PRs, and issues
  • Leads consolidate updates across repos and teams
  • Context often gets lost, and reports vary in quality

This made it a perfect candidate to test agentic workflows, where agents can:

  • Observe repository signals
  • Reason over changes
  • Generate structured, human‑readable output

What Are GitHub Agentic Workflows (In Simple Terms)?

Traditional GitHub Actions follow a deterministic, step-by-step execution model. Agentic workflows, on the other hand, introduce a more intent-driven approach:

  • You define what outcome you want
  • Agents decide how to reach that outcome
  • Agents can iterate, reason, and refine results

POC Architecture Overview

At a high level, the workflow looks like this:

  1. Trigger

    • Scheduled (daily) or manual trigger
  2. Context Collection Agent

    • Gathers commits, PRs, issues, and workflow runs
    • Focuses only on activity within the last 24 hours
  3. Reasoning Agent

    • Groups related changes
    • Filters out noise (minor version bumps, formatting-only commits, etc.)
    • Identifies themes (features, bug fixes, infra changes)
  4. Report Generation Agent

    • Produces a clean, structured daily status report
    • Outputs in Markdown for easy sharing

Designing the Agent Logic

One of the most interesting parts of this POC was thinking in terms of agent behavior, not steps.

Instead of:

  • “Fetch commits”
  • “Loop through commits”
  • “Format text”

I defined instructions like:

  • Summarize meaningful engineering progress
  • Highlight risks or blockers if detected
  • Keep the tone concise and leadership-friendly

This shift in mindset is where agentic workflows really shine.

Here are the steps 

  1. Create one repo in GitHub, here I have created simple terraform code (Not a Production Grade though )
  2. Install the GitHub Agentic Workflows extension. here is the code gh extension install github/gh-aw
  3. Add daily status report workflow in your repo gh aw add-wizard githubnext/agentics/daily-repo-status 
  4. Select appropriate AI Engine as per your choice, in this demo we will choose first option i.e. GitHub Copilot CLI with agent support option
  5.  Now we need to create PAT token and paste in above CLI terminal
  6. Just generate new New fine-grained Personal Access Token and give Read only access to  Copilot Requests, generate PAT token and copy in above step
  7. This will create a new PR, just merge it from CLI
  8. The daily-repo-status.md file contains markdown description what Workflow Agent should do. 
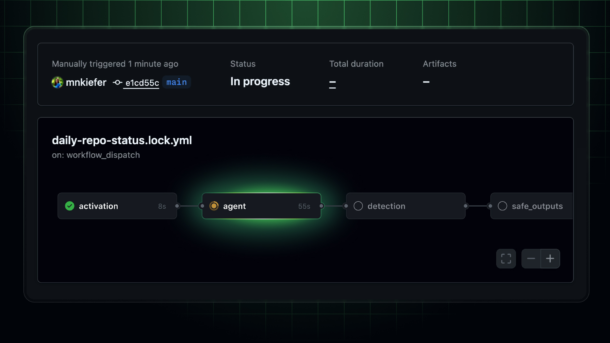
  9. The daily-repo-status.lock.yml file contains actual Agentic Workflow Action

Sample Output: Daily Status Report

Here’s an example of the kind of report the workflow generates. Basically this GitHub Agent workflow will generate daily status report of your GitHub Repository and create a new issue:

Daily Engineering Status – 19 Feb, 2026 – https://github.com/ranglanimanish90/newinfra/issues/5

  • Project 

    • Basically report is giving generic overview of the project repository
    • What type of code it contains. E.g. in this case it is using IaC
    • Recent Activities in last 24 hours
  • Pull Request, Releases, Issues

    • How many Open PRs, closed PRs
    • New Releases v1.0 “Release v1”
    • Open Issues, closed Issues
  • Recommendation for next step

    • Terraform module updates for logging standardization
    • Testing and Validation scope
  • Critical security Alerts 

    • Check this our another daily status report https://github.com/ranglanimanish90/newinfra/issues/13
    • Here it found out that there is one hardcoded AWS Secret added in code and asking to remove it immediately. (Please note given AWS Key is dummy and added just to validate effectiveness of Agent to capture security loop holes)

The output is consistent, readable, and context-aware, without manual effort

What Worked Well

Reduced Manual Effort
The report is generated automatically, saving time for both engineers and leads.

Consistency
Same structure, tone, and level of detail every day.

Context-Aware Summaries
The agent doesn’t just list commits—it explains what changed and why it matters.

Challenges & Learnings

⚠️ Prompt Quality Matters
The clarity of GitHub Agentic Workflow agent instructions directly affects output quality. Small wording changes can significantly improve summaries.

⚠️ Noise Control
Without guidance, agents may over-report trivial changes. Explicitly defining “what is meaningful” helps a lot.

⚠️ Trust but Verify
Agentic output is powerful, but for leadership-facing reports, a quick human review still adds confidence.

Where This Can Go Next

This POC opens up several interesting possibilities:

  • Weekly or sprint-level summaries
  • Release notes auto-generation
  • Engineering health dashboards
  • Integration with internal DevOps portals or CoEs

Personally, I see strong potential for using agentic workflows as DevOps accelerators, especially in large, multi-repo environments.

Important Notes..

  • Avoid updating daily-repo-status.lock.yml file directly otherwise your GitHub Action workflow will fail.
  • If you need your Agent to work in specific way just write down details in daily-repo-status.md file and compile your code using command –> gh aw compile

System Manager cross-account Parameter sharing

Recently on Feb 22, 2024 AWS has launched  new capability to share Parameters in System Manager across the AWS  accounts.

AWS Systems Manager’s Parameter Store is a tool that helps one to safely store configuration information. Now, it lets us share more advanced configuration details with other AWS accounts. This makes it easier to manage all your configuration data from one central location. 

Many customers have work spread across different AWS accounts, all relying on the same configuration data. With this update, you can avoid the hassle of copying and syncing data manually. Instead, you can share parameters with other accounts that need access, creating a single, reliable source for all your configuration data.

In this blog post, I will guide you through the process of sharing AWS System Parameters with another AWS account. Here are the steps to setup how to create and share Parameter:

  1. First of all let’s create a new Parameter in Parameter Store, click on ‘Create parameter’ button
  2. Provide Name and ensure to select Advanced Tier. Please note cross account Parameter share is only possible if you select Tier as Advanced
  3. For now lets consider type as String and value as t3.medium 
  4. Click on ‘Create parameter’ button
  5. The parameter is created now
  6. Click on the parameter and select ‘Sharing’ tab and click on Share button.
  7. This will open new window for ‘Resource Access Manager’
  8. Click on ‘Create resource share’
  9. Enter Name, in Resources drop down select ‘Parameter Store Advanced Parameters’
  10.  This will show you Parameters that you have created in this account, select parameter which you want to share with other accounts. In our case it would be InstanceType and then select Next
  11. Choose Permissions for sharing parameters either AWS Managed or Customer Managed, for this demo lets choose AWS Managed Permission
  12. Let’s select AWS account with whom you want to share Parameter. In our case we choose to share it with account named ‘AI-POC’
  13.  Click next and click ‘Create resource share’
  14. Now your resource share has been created 

Next let’s see how to access Parameter created above:

  1. Now lets login to consumer AWS account in our case it would be ‘AI-POC’ 
  2. Go to RAM (Resource Access Manager) and click on ‘Resource shares’ under ‘Shared with me’
  3. You would be able to see Parameter which was shared from earlier account.
  4. Consumer account can access shared parameters using the AWS command line tools, and AWS SDKs.
  5. Here is the CLI command –> aws ssm get-parameter –name arn:aws:ssm:us-east-1:<ProducerAWSAccount#>:parameter/InstanceType
  6. Here is the output of the command, you would able to access Parameter value.

Important Notes..

  • Your consumer accounts receive read-only access to you shared parameters
  • The consumer can’t update or delete the parameter
  • The consumer can’t share the parameter with a third account
  • To share a parameter with your organization or an organizational unit in AWS Organizations, you must enable sharing with AWS Organizations
  • To share a SecureString parameter, it must be encrypted with a customer managed key, and you must share the key separately through AWS Key Management Service

I hope you find this blog post enjoyable and that it provides you with a high-level understanding of how cross-account parameter sharing operates. If you appreciate this post, please consider sharing it with others 🙂

Connect AWS EC2 without Public IP Address

AWS has recently unveiled an exceptional feature that enables direct connections to instances in a Private Subnet without the need to assign them a Public IP address. With the assistance of EC2 Instance Connect Endpoint, you can now conveniently establish SSH/RDS connections to these instances.

Previously, customers had to rely on a bastion host to establish connections with instances in a Private Subnet. However, the reality is that managing a bastion host can be burdensome in itself.

In this blog, i will show you simple steps to SSH your instance in Private Subnet from browser and local machine.

Note

There is no additional cost for using EIC endpoints. Standard data transfer charges apply.

Here are the steps to setup this configuration:

  1. First of all ensure to grant required IAM permissions to user who want to use EC2 Instance Connect Endpoint
  2. Setup Security groups for EC2 Instance Connect Endpoint
    •  To setup security group, consider following sample setup An EC2 Instance Connect Endpoint with a security group and an EC2 instance with a security group.
    • The EIC Endpoint Security Group has one outbound rule that allows TCP traffic to the Development Security Group. This configuration means that the EC2 Instance Connect Endpoint can only send traffic to instances that are assigned the Development Security Group
    • EIC Endpoint SG send outbound TCP request (SSH and RDP) to Development SG 
    • Development SG accept inbound TCP traffic (SSH and RDP) from EIC Endpoint SG
  3. Create new endpoint as shown below
    • Name –  MyEndPoint 
    • Service Category – EC2 Instance Connect Endpoint
    • VPC of your choice
    • Security Group – EIC Endpoing Security Group
    • Subnect – Select your Private Subnet in which Instance will be launched
    • click ‘create endpoint’ button
  4. Provision new EC2 Instance in Private Subnet and associate Development SG to it.
  5. Note there is new EC2 instance created without and Public IP address. There is Private IP assigned -10.0.4.135
  6. In order to connect EC2 instance, simply select instance -> click Connect button
  7. Select ‘Connect using EC2 Instance Connect Endpoint’
  8. Select EC2 Instance Connect Endpoint created in step #3 and click on Connect
  9. You are successfully connected to EC2 instance from browser.
  10. Alternatively, if you want to connect EC2 instance from local machine using Powershell then simply run this command aws
    ec2-instance-connect ssh –instance-id i-0a9e3ddcddfaedb2c
  11. ta-da, you are conneted to instance in Private Subnet.
I hope you found this article enjoyable!! Feel free to share it within your network.

Walkthrough of AWS User Notifications

On May 3, 2023 AWS has launched one new service called as ‘AWS User Notifications’. AWS User Notifications enables users to centrally setup and view notifications from AWS services, such as AWS Health events, Amazon CloudWatch alarms, or EC2 Instance state change, in a consistent, human-friendly format.

Users can view notifications across accounts, regions, and services in a Console Notifications Center, and configure delivery channels, like email, chat, and mobile push notifications, where they can receive these notifications.

Here are the steps to configure AWS User Notification into your account

  • Go to the AWS Console
  • Search for ‘AWS User Notifications’ service
  • Click on ‘Create notification configuration’ button
  • Fill in Events detail
  • In Event rules section, mention for which AWS service you want to receive notification, event type and Region as well.
  • In this blog, we are configuring event to receive notification as soon as there is any state change in any of EC2 instance within US East (North Virginia) region
  • You can add multiple Event rules
  • Next, mention delivery time of notifications based upon your need. 
  • Now configure how would you like to receive notification. In this example, we have selected to receive Email notification on email address and on AWS Chatbot
  • Once done, click on ‘Create notification configuration’ button
  • At this stage you have successfully done the Event configuration
 
Now let us start the EC2 instance in (North Virginia) region
 
Soon you will automatically receive notification in notification area

User will receive email notification on configured Email address

Here is the notification on AWS Chatbot configured Microsoft Teams Channel

Importanat Notes:

1. This service is offered by AWS at no additional cost

2. As of today customization of notification title or body is not supported

Similarly, you can configure event notifications for other AWS services like S3, ECS, Event Bridge, Step Function and many more..

AWS Chatbot Integration With Microsoft Teams

Going forward you can use AWS Chatbot to view, troubleshoot and operate AWS resources directly from Microsoft Teams. By leveraging AWS Chatbot for Microsoft Teams or any other chat platforms, you can receive notifications from AWS services in your chat channels and execute infrastructure-related tasks by entering commands, eliminating the need to switch to another tool.

What is ChatOps?

Communicating and collaborating on IT operation tasks through chat channels is known as ChatOps. Basically, it allows Cloud Engineers to centralize the management of infrastructure and applications, automate and streamline workflows

AWS had launched Chatbot back in 2020 with Amazon Chime and Slack integrations. Subsequently, the chat platform ecosystem has undergone swift development, and a large number of individuals are presently utilizing Microsoft Teams.

In general, real-time notifications regarding system health, budget, new security risks or threats, and the status of your CI/CD pipelines are desired to Cloud Engineers. This is where ChatOps integration with MS Teams could be helpful. Additionally, you have the option to directly input most AWS Command Line Interface (AWS CLI) commands into the chat channel. This enables you to access supplementary telemetry data or resource information, or execute runbooks to resolve issues. 

AWS Chatbot allows you to create custom aliases for frequently used commands and their parameters, reducing the steps needed to complete a task. These flexible aliases can include personalized parameters, making command entry easier. AWS Chatbot’s natural language processing allows you to ask questions in everyday language, and receive relevant AWS documentation or support article extracts as answers. You can also use natural language to execute commands. E.g. show me my ec2 instances in us-east-1.

In this video I will showcase how to configure the Integration Between AWS Chatbot and Microsoft Teams.

Enable AWS Systems Manager for all EC2 instances in an account

Recently, on Feb 17, 2023 AWS have released new feature which will enable customers to on-board all EC2 instances in account with AWS System Manager, that too with minimum configuration. Isn’t it great!!

Did you Know?

Any instance/ node which is configured for AWS System Manager is called as Managed Instance/ Managed Node. Whether it is AWS EC2 instance, Azure VM (Hybrid Environment) or On-Premise Server.

Earlier if any EC2 instance was require to be configured as Managed Instance then an IAM instance profile/ custom role was needed to be attached with every EC2 Instance manually. This could get cumbersome if there are EC2 instances to be managed at the scale.

This scalability is possible with new feature called as Default Host Management Configuration (DHMC) agent. DHMC simplifies the experience of managing EC2 instances by attaching permissions at the account level

You can begin utilizing the benefits of DHMC in just a few clicks from the Fleet Manager console. This feature ensure Patch Manager, Session Manager, and Inventory are available for all new and existing instances in an account.


Important:

  1. In order to leverage benefit of Default Host Management Configuration feature, you need to ensure all instances with Instance Metadata Service Version 2 (IMDSv2) in your account  should have SSM Agent version 3.2.582.0 or later.
  2. Default Host Management Configuration doesn’t support Instance Metadata Service Version 1.
  3. You need to attach IAM instance role at System Manager level, System Manager assume role by calling EC2 services.
  4. You must turn ON the Default Host Management Configuration setting in each Region you wish to automatically manage your Amazon EC2 instances.

In this short video I will demonstrate how to use this new feature. 

ChatGPT in VSCode

As we know OpenAI’s ChatGPT has gained popularity in past few months. Microsoft has integrated the AI feature into number of their products like MS Team, PowerApps, Power Automate, PowerBI, Word, PowerPoint, Outlook, recently in Bing search engine and Edge web browser. List goes on and on.

The latest in the queue is the ChatGPT extension for VSCode. ChatGPT extension as co-pilot will help Developers to write fast and efficient code without switching the context between multiple apps.

Developers can use this free extension to Write Code, Find Bugs, Generate Comments, Optimize Code, Create Test Cases. Complete Code. Yes this extension can help you to complete half written/ incorrect code. It provide correct code snippets

It works like charm!!

Watch below video to understand the capabilities 📽️

Azure Automation Visual Studio Code Extension

During January 2023 Microsoft had launched Preview of Visual Studio Code Extension for Azure Automation. Azure Automation is one of the commonly used Azure service, which is used to automate mundane activities by IT Professional.

Azure Automation provides a new extension from VS Code to create and manage runbooks. Using this extension, you can perform all runbook management operations such as, creating and editing runbooks, triggering a job, tracking recent jobs output, linking a schedule, asset management, and local debugging.


Pros
  • No need to go to Azure Portal for Managing Runbook
  • Improve overall E2E time for support
  • Local Debugging – Yes you can debug your runbook locally, this was headache for Support Engineers since there was no provision for debugging script from Azure Portal (Except relying on output stream). Though this is feature is still in preview but will definitely be helpful in future.
 
Limitations as of writing this blog (Feb 2023)
  • Creation of new schedules.
  • Adding new Certificates in Assets.
  • Upload Modules (PowerShell and Python) packages from the extension.
  • Auto-sync of local runbooks to Azure Automation account. You will have to perform the operation to Fetch or Publish runbook.
  • Management of Hybrid worker groups.
  • Graphical runbook and workflows.
  • For Python, we don’t provide any debug options. We recommend that you install any debugger extension in your Python script.
  • Currently, we support only the unencrypted assets in local run.
Please watch this video to understand how to create and author runbook with VS Code
 

Connect PowerApps with AWS RDS Postgres DB

If you are building apps in PowerApps (No-Code /Low-Code framework) then you may require to connect multiple data sources like SharePoint List, Dataverse Table, Cloud storage like Azure SQL Database etc.  As PowerApps is part of Office 365 family products and powered by Azure. It would be easy for Developers to connect to various Data Sources within Microsoft or Azure Eco-System.

What if requirement arise to connect to Data Storage in another Cloud Provider e.g. AWS or GCP. Well that is also possible. Let’s say there is need to connect to AWS RDS Postgres Database with PowerApps, then you don’t need to move database in Azure Cloud infact you can directly connect with AWS RDS.

First you need to create new custom Connection for AWS RDS DB and then use that Connection in PowerApps to connect Postgres DB tables.

Please watch this video for step by step process to do that.

Connect Non Azure VM or AWS VM with Azure Automation Account

If you the Cloud Support Engineer and handling day to day Cloud Operations then it would be obvious that you would be doing Patching and Installation of VM updates.

As we know Azure provides an option to handle auto installation of updates at the scale with help of Automation Account. You can not only handle updates installation for Azure VMs, but also for Non-Azure VM like VM from other Cloud provider AWS and GCP (Multi-Cloud), On-Premise VMs etc. Here are the steps to connect AWS VM with Azure Cloud

1. Setup Automation Account
  • Go to the Azure Portal https://portal.azure.com/
  • Create new Automation Account
  • Once done, go inside the newly create Automation Account
  • In left hand side menu select ‘Update Management’
  • We need to create Log Analytics workspace, basically it captures all log data from Virtual Machines and send it to workspace.
  • Select ‘Create New Workspace’ in drop down and click Enable button
  • It will take approx. 5 mins to setup new Workspace.
 
2. Get Log Analytics Workspace Details
  • You would need to get agent details from Workspace
  • Go to the Workspace created in Step 1
  • In left hand side menu select ‘Agents management’
  • Based upon the type of OS (Windows/ Linux), download the agent installation file
  • Also, copy 3 important details i.e. Workspace ID, Primary Key, Secondary Key
 
3. Install Agent on Non-Azure VM
  • Let’s create new Windows Machine in AWS Cloud
  • Login to Virtual Machine
  • We need to install agent which was downloaded in Step 2
  • Copy agent file MMASetup-AMD64.exe to AWS VM
  •  Click on exe file and start installation process
  • Follow the instructions, click on ‘Connect the agent to Azure Log Analytics’ option
  • Insert the Workspace ID, Primary Key which you had copied in Step 2, click Next
  • Finish the installation

Come back to the ‘Update management’ option with Automation Account. If you notice, it has already started detecting that one new VM is connected and sending logs to Log Analytics Workspace. Just click on ‘Click to manage machine’. 


This is EC2 VM, just click on Enable button


It will take approx 45 mins for AWS VM to show up in Azure Update Management and from there you can monitor status, compliance, schedule updates deployment to AWS VM. Please note Platform is Non-Azure and OS is Windows


This is one the the multi-cloud scenario. Happy learning!!